Although this project was completed in the summer of 2011, it is forever etched into my heart. My friend had purchased a thrifted piano and I helped her transform the piece into an ode to Rockabilly Music.
I had posted about it on my old blog, but I received several requests to share the steps again.
So, here it goes:

Red, white, turquoise and RHINESTONES... what's not to love?!
STEPS to BRING NEW LIFE to a PIANO
a.k.a How to paint a piano.
1. Gather supplies
Painter's Tape
Screw Driver
Primer [We used Zinsser in the Gold/Brown can] oil-based
Floetrol [for even paint strokes - use with paint color]
Paint Color(s) of Choice [We used Valspar Paints from Lowe's]
Good Paint Brushes [for oil-based and acrylic]
Paint Thinner [for cleaning oil-based used paint brushes]
Plastic Containers [for mixing Floetrol with Paint Color]
MinWax Polycrylic [water-based protectant]
Sand Paper [gentle to rough grade grit]
Tack Cloth [for dusting the piano]
Puddy Knife for any Wood Filler Needs
Wood Filler
Brasso [for any metal polishing needs]
Rags and Plastic
Any Extra Accessories [like rhinestones]
 |
| BEFORE v. AFTER |
2. Dismantle
For ease of painting, drying, and everything sane. We dismantled the piano. You don't have to perform this step, but we did not want a caked-up-glob-of-mess in the spaces throughout the piano. Plus, the piano tuner described exactly what we needed to do... and it was easy. Just required a screw driver... and I would recommend 2 people.

We worked on each individual piece.
Even the piano bench top.

3. PROTECT the Keys
We used painter's tape. We also added towels to the top of the strings for additional protection.
[Tape and towels may be seen in Step 5.]
4. Sand
Make sure the piece is clean {and dry} before starting this step....
We sanded the entire piano. Not too much... with a medium grade sand paper. About 5 minutes of light sanding on each spot. Enough to get any uneven spots or blemishes even. Prior to this step, if your piece has marks or chunks of missing wood, use a wood filler, let dry, and sand that portion to even. You don't have to sand all the varnish off. As long as your surface is smooth, clean and you apply primer... the surface should withstand use. We utilized a tack cloth to wipe all the dust off the piece after sanding was completed.
5. Prime
We utilized Zissner's Oil-based Primer in the Gold/Brown can. I ALWAYS have to remind myself that any piece will look horrible after priming. It just does. It's not a smooth looking paint job, it's not solid, and it just looks awful. This project was no different. I really had to hype myself up that it was going to look awesome once we started getting some paint on this thing.

We used one coat of primer and let dry completely overnight. It's really important to prime. It provides a great base for the paint to adhere to the piece. And on such an instrument that is going to get a lot of use and traffic, primer {and sealant} is so important.
6. Paint
We used Floetrol to help decrease/eliminate any brush streaks in our final product. We followed the recipe on the bottle. This little bottle isn't necessarily cheap, but it will last F-O-R-E-V-E-R! So, worth the effort and so worth the extra dry time that will be needed. It extends the dry time to help eliminate the drag drying paint and the paint brush strokes create.
We used a high gloss paint... but the Floetrol will reduce some of the gloss since it is, in essence, diluting the paint. But, we weren't worried about the gloss/shine since we were going to add several coats of acrylic protectant.
We used 3 coats of aqua paint. We could have stopped at 2 [you will probably need at lest 2] but, there was still quite a bit of paint left over in the little cup. We still have about 3/4 of a gallon of paint left!
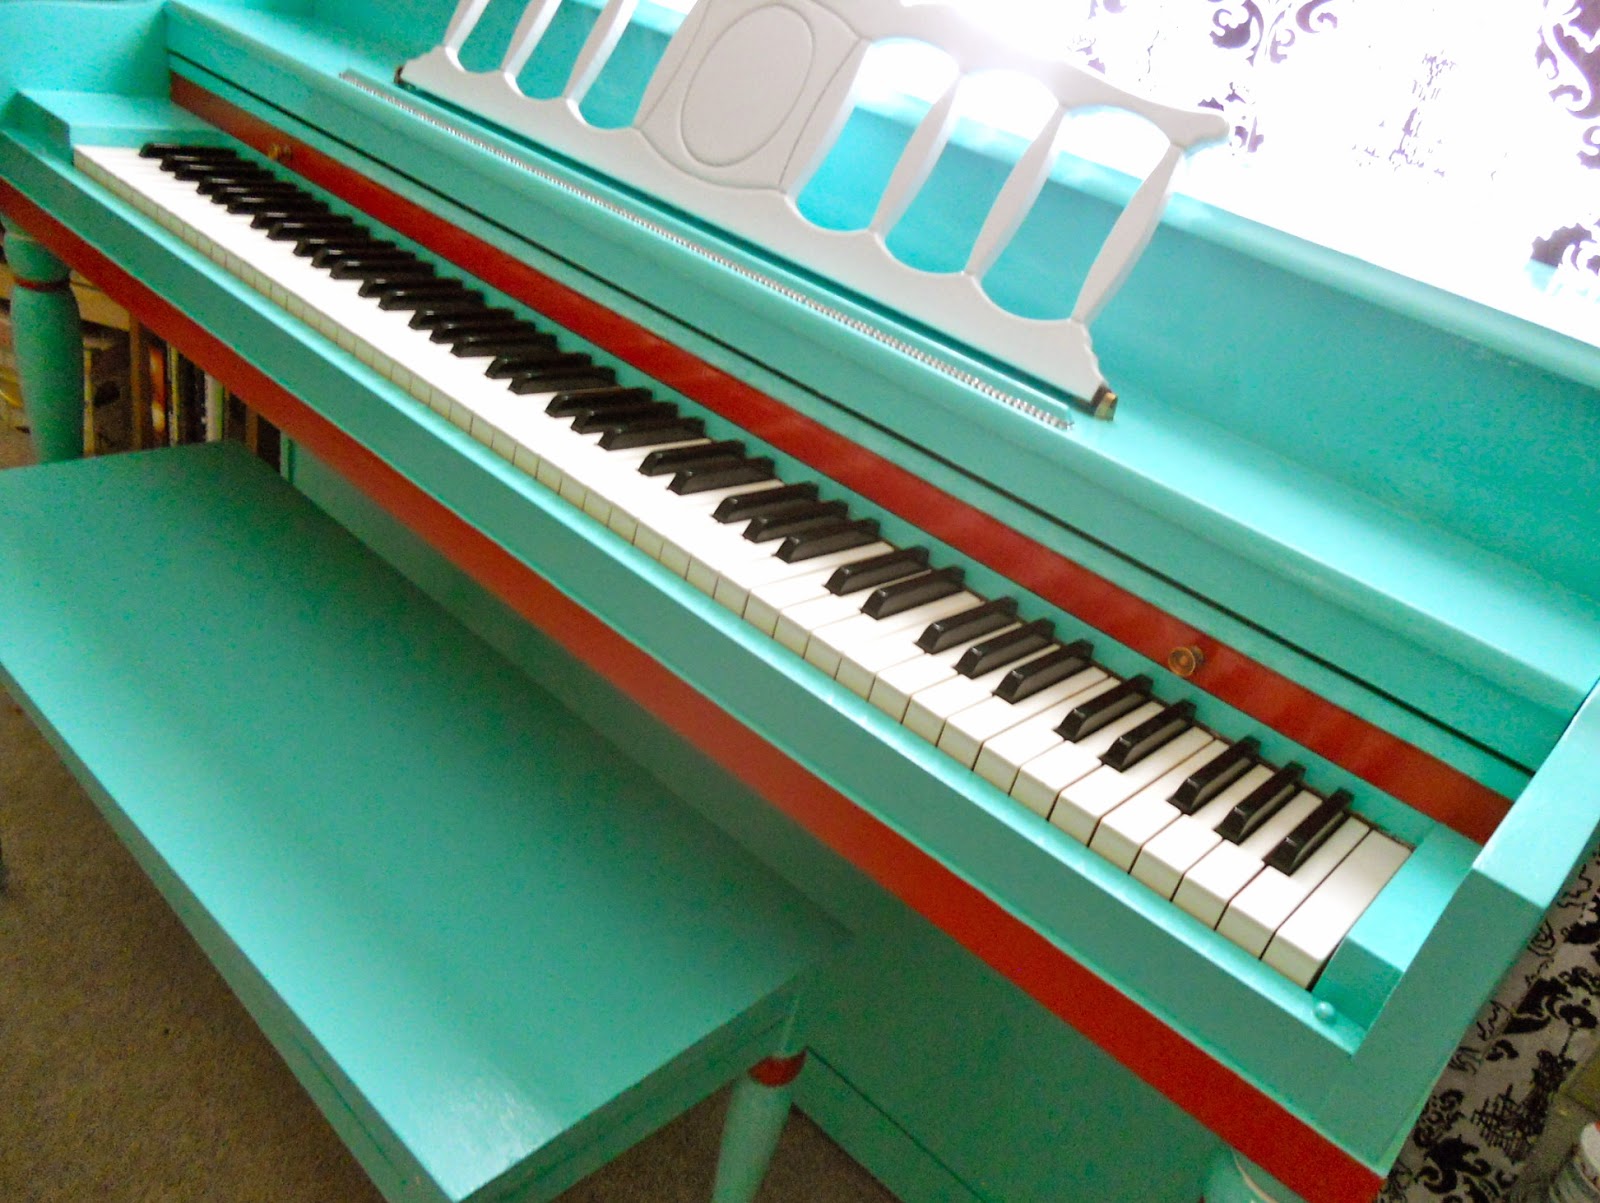
We then painted the second color [a bright beautiful red!] on selected areas. The turned legs really provided a great element to emphasize! We also decided to paint the inside of the piano bench with the red. It provides a nice surprise PUNCH when opening to look for sheet music... hehehe.
We then painted the music stand white, along with another ring on the piano legs.
Note: In between coats, the surface may be lightly sanded to smooth out any streaks or clumps/drips that may appear. Use a tack cloth to wipe down the area after any sanding.
7. Water-Based Polycrylic Top Coat Protectant
We utilized the Minwax Polycrylic Water-Based Top Coat Protectant. We did this not only for the protection, but for the added high gloss. The directions state to apply at least 2 coats. We did 3 coats [4 coats on the piano seat].
We reassembled some parts of the piano prior to applying the polycrylic.... but you need to be very careful, because any moving parts could become stuck while drying. Use your judgement when deciding the appropriate time to reassemble your piano.

8. Polish the Metal
We used Brasso to polish the pedals and knobs. I was expecting it to work nicely... but not this well!
I couldn't believe my eyes! I thought the pedals were really worn down. Like, couldn't-be-shined-because-the-actual-metal-was-damaged-and-pitted... WRONG! This stuff worked wonders! Brought new life to those pedals!
9. LET DRY!
Seriously, we let the polycrylic dry for at least 48 hours. It was more like 3-4 days! Worth the wait!
We added the rhinestones after the polycrylic completely dried.

10. ENJOY!!!!!
If you perform a personal project such as this... ENJOY your hard work.

Sit back, relax... take in all the hard work, time, energy, joy, passion, and...

love that was poured into it!
After all, you deserve a pat on the back and the thrill of relishing in the new life you helped birth!
I did not receive any payment or incentives on the products or stores I have mentioned in the above post.
Linking up to Not Just A Housewife and Thrifty Decor Chick link parties.
Linking up to Not Just A Housewife and Thrifty Decor Chick link parties.


This is so fabulous I can hardly stand it! Popped over from TDC's Before & After :)
ReplyDeleteThank you SO much, Heather!
DeleteHave a FANTASTIC day ;)