Pages

Thursday, May 30, 2013

PARTIES: Adult Circus Theme

In our household, summer means gifts for the hubby.... Every. Single. Month.

Truly.

Father's Day --- Anniversary --- Birthday

That means that my mind is racing with gift ideas for the hubster. Hence, it got me thinking to his Birthday Party last year.... so, I thought I would share it with y'all. 

We decided to start a new tradition last year. We would attend the Greatest Show on Earth every year for the hubby's birthday {it comes to town just across the street... and there is a show every year on his actual birth date... why not?!}. But, the question remains: Do I hold a Circus Themed Birthday Party for him --- every year? Well, we did last year.


And we don't take celebrations lightly around our Double-Wide in the Sky. Oh, the pressure!

Looking back at last year, kiddo decided we should hold a party for our favorite man. And since... we were planning to go to the circus on his birthday {hence the start of the tradition}.... we decided the theme of the party would be a CIRCUS theme. And the color scheme would be a little bit more masculine: black, white and red.

So, we went to work planning this elaborate celebration for a small "intimate gathering" {as kiddo called it}.

First job was creating the guest list. We didn't want to go all out since we were planning to head to the circus by a specific time. So, we decided to invite the hubby's co-workers for a Birthday Happy Hour. Which is perfect because my hubby works with some AMAZINGLY cool and AWESOME people. Which makes for a fantastic party guest list. It was also perfect.... because hubby works just across the street. So, people walked over when the Happy Hour started and walked back when it ended. PERFECT.

Next was creating decorations.

This was the VERY fun part.

Balloons - check
Streamers - check
Banners - check


Clown Noses... Mustaches....


CHECK and CHECK!


Ha! These mustaches were super easy to create. I found the fuzzy adhesive mustaches at Party City. I simply cut a larger mustache out of black cardstock and adhered the fuzzy mustache onto said cardstock mustache and then adhered it to a candy stick using glue dots. Easy-Peasy and super fun! I also created some lips... better to kiss you with my dear....


While I was at the party store... I found some carnival tickets. And the idea to use them as a simple cupcake topper hit my brain. It turned out AWESOME and it was super quick!


I also used the tickets to decorate the straws, along with some red and white striped paper.


Believe it or not, I had picked up these paper straws at ZGallerie. They were on clearance. So naturally, I cleaned them out of their inventory. I just thought the gray and white would be so versatile. I was right! 

Next came the cake topper.... again I used the carnival tickets and a little souvenir I brought back from Guatemala.


I hung black, white and red decor from the windows. It gave somewhat of a Big Top tent feel. That's what I was going for without the work of creating fabric {or plastic table clothes} to drape into the center of the room. This was clean and simple.


Next up was the menu.

Since it was a Happy Hour, I wanted to have some heavy appetizers. Especially since I didn't want to spend all that extra $$$$ at the circus on gross food {which sometimes you just have to have}. So, I decided to stick with the circus theme.

CIRCUS THEME MENU
Hot Dogs {of course!}
Caprese Salad on a Stick
Roasted Peanuts
Popcorn
Strawberries
Circus Marshmallow Peanuts
Cotton Candy
Home-made Whole Wheat Pretzels 
Chocolate Cake
Margarita Cupcakes {for the adults only}

and of course.... adult beverages and fun kiddo drinks.


I simply folded down small lunch sacks and tied a carnival ticket with baker's twine for the roasted peanuts. And BTW, it was quite difficult to find the roasted peanuts with the shells. I ended up finding them at the liquor store... of all places! But, I guess it does make sense.


It was great to have a light and refreshing component to the menu.... but something with protein. The caprese salad was an easy solution that was also brilliantly displayed. Mozzarella balls, grape tomatoes, basil and some balsamic vinaigrette.  My kiddo thought the "lettuce" was the best he had ever tasted! Perfect!


Strawberries were also a nice alternative. Although.... I think only one was eaten.


The popcorn was devoured.... and how fun in the little popcorn containers.


I used the same craft paper to create the cones for the cotton candy and the water bottle labels.


The Blue Cream Frostie Soda.... is my hubby's favorite. So, we had to have some of that on hand at the beverage station!


I always like to create a luxurious set-up with the beverage station. It's adds an extra dose of fun... creating your drinks with festive little straws, fruit and quirky elements.


Hot dogs were a piece of cake! Popped them in the slow cooker on high for 2 hours and then turned down to warm for the party. Cooked well and tasted great! I had a selection of whole wheat and white hot dog buns. A little relish for those who like the extra kick. And of course, I had to be a little festive with the ketchup and mustard. {These containers will be fun to keep on hand.}


The pretzels were SO delish! I don't know how they keep after a day. They were all eaten. Several by... yours truly. They were seriously good!


So, that's how kiddo and I put together a little Circus Happy Hour Birthday Party for my hubby... last year.

A whole lot of LOVE and FUN went into this shindig!

I have to say....
I think it was...
The Greatest Circus Happy Hour Birthday Party on Earth!

Now.... Do I do it AGAIN this year?
I simply can't do the same thing twice.... your thoughts?

Tuesday, May 28, 2013

Kiddo's Room {Re}Design

We have just returned from a little relaxing vacation.

I got to visit with family that I haven't seen in awhile. It was so lovely, we were able to create many new memories.
Kiddo had a FABULOUS time... and so did our dog, Sir Chewbacca {he LOVED chasing butterfiles in the grass - adorable!}

But, now we are back and there are many MANY things to do... and... do!

One of the priorities is a slight redesign of kiddo's room. He is in DESPERATE need of book shelving.  Plus, we wanted to lighten up his bedroom a bit. It is painted a denim blue color and he has several black accessories and dark wood components throughout the room. So, we thought we would have some fun and add color with the bookshelves. We won't be repainting or changing out much of the furniture. But, I think this will make a rather enormous design impact!

Here is what we have so far:


Below is kiddo's current comforter. We will not be replacing this. He also has a large wool area rug from CB2 {discontinued} that has similar green colors as the above pillow. He also has a few other items with this accent color. I think it compliments the red, white and black well.
PB Teen

The bookcases will be flanking his bed. So, we needed another solution for lighting. He is such an avid reader and LOVES to read at night. We thought it would be fun to add these lights above his bed.

Ikea Wall Mount Lamp
We will see how this all turns out.

For now.... we will make due and I promise to reveal the room once it is done!

Have a FANTASTIC week!

Friday, May 17, 2013

Oatmeal Butterscotch Cookies

Or.....  Oatmeal Scotchies!


These cookies are some of my mother's favorite cookies ever. I have learned that when it comes to butterscotch.... you either love it or hate it. I am my mama's girl...so, I love it! 

Making these delicious cookies are always a wonderful thing for me! But, I just don't make cookies all the time because of them being you know.... so sweet and ahem fattening {totally, because I have no self-control while eating said cookies ---- I don't know when to stop --- the temptation is just too doggone great!}. 

Here is my "secret" to making not-so-unhealthy delicious cookies: 

I utilize no sodium baking soda, Stevia, and whole wheat flour. I use a little less butter and salt.
I also use 2 egg whites instead of 1 egg.

Simple and easy substitutions that seem to make me feel a little better about eating the whole batch in one sitting {ok --- that has never happened --- but, the desire is there, my friends!}

Here is my recipe for these DELICIOUS cookies! 

BUTTERSCOTCH OATMEAL COOKIES
Yield: approximately 42 cookies
Prep Time: 15 minutes | Bake Time: 8-10 minutes

Cupcakes:
1/4 cup all-purpose flour
1 cup whole wheat flour
1 teaspoon baking soda*
1/2 teaspoon ground cinnamon
1/4 teaspoon nutmeg
1/4 teaspoon salt
1 3/4 cup unsalted butter, slightly softened and cut into chunks
3/4 cup Truvia or Stevia
3/4 cup backed brown sugar
1 egg at room temperature
2 egg whites
1 teaspoon vanilla extract 
3 cups of quick or old-fashioned oats {I used quick}
1 2/3 cups {11 oz package} Butterscotch Chips

* I use sodium free baking soda, therefore I have to double the amount: 2 teaspoons of baking soda

1. Preheat the oven to 375 degrees F. 

2. In a medium bowl, combine together flour, baking soda, cinnamon, nutmeg and salt; set aside.

3. In an electric mixer on medium-high speed, beat the butter, brown sugar, Stevia, eggs and vanilla extract .

4. Gradually beat in the flour mixture.

5. Stir in the oats and Butterscotch Chips.

6. Drop by rounded tablespoons onto and ungreased baking sheet.

7. Bake for 8-10 minutes. {less time more chewy - greater time more crisp}

8. Cool for 2 minutes on baking sheet; remove to wire racks to cool completely.

ENJOY!

Hope you have a FANTASTIC weekend!

I will be enjoying these cookies with my family {that means I have to have self-control and not eat the whole batch!}. 
We have a lot to celebrate while together:

Grandpa's 80th Birthday
Mom's 60th Birthday
Mom and Dad's 40th Wedding Anniversary
Grandparents' 61st Wedding Anniversary

A LOT to celebrate!

So, do you love or hate butterscotch?

Tuesday, May 14, 2013

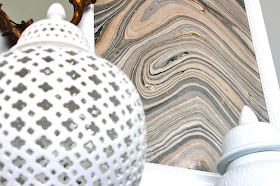
Marbled Prints

Marbled Prints are SO DIVINE!
Stella McCartney Marbled Printed Silk Dress

Marbled Prints are popping up practically everywhere!

And.... FRAMED Marbled Prints are SO chic.

The color movement in the pieces are just so fluid and tranquil. 
It doesn't matter the colorway.... they are breath-taking!


I have had these pieces in my home for awhile now. 

I LOVE them!

I have changed the frames to this thick white border... and it just makes the pieces pop!


True artwork!


I have a colorway of pink and greys available at my space at Lost...Antiques. They, too, are framed in a 2" white border.

Simply ---- DIVINE!

If you want to keep up with highlighted inventory at my space at Lost....Antiques, feel free to "like" Floor 24 Designs on Facebook.

Have a fantastic week, friends!

Sunday, May 12, 2013

Today is a Special Day

HAPPY MOTHER'S DAY!


"You know what makes Mother's Day so special?"


"It's spending a wonderful day with you!"

Areaware Gold Pig Designed by Harry Allen
Card {handmade} and gift given with love from my kiddo and his daddy --- how special.

They know my heart.....

They know my desires {seriously.... this gold pig means SO much to me. Simply. Perfection!}


For all you out there who provide love, warmth, comfort, encouragement to someone --- today is YOUR day.

HAPPY MOTHER'S DAY!

Wednesday, May 8, 2013

Pinterest Pretties

I was recently asked where I get inspiration for my artwork. 

Since, I mostly work with color schemes, I really do pull a lot of inspiration from what I see around me every day.

And when I say every day..... that definitely includes Pinterest inspirational sources.
{That app on my phone makes it so dog-gone easy to quickly browse and repin favorite images/inspirations... All. The. Time!}

Here are some images I have recently pinned. They have provided color inspiration to some of my recent artwork.

Jordan Carlyle Home Tour


Neutrals.... neutrals... neutrals.....

I am just MAD about neutrals with GOLD and SILVER accents.

It's what I have surround me in my home and it is one of the most soothing palettes for me to paint.

Here are a couple of those large canvas neutral paintings.

Hazy Bliss can be found at Again and Again in the Dallas Design District.


And then, have you heard about this little thing called "Color of the Year".... ummmm yes..... I am OBSESSED with greens lately.

Here is one fun image I pinned. I love the play on patterns in the drapery, rug, lampshade and bed skirt. That chair, is just one awesome chair with the contrast piping. LOVE!

Emerald Rooms - House Beautiful
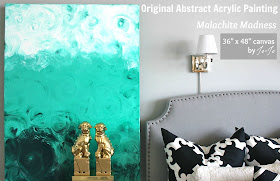
And have you seen Malachite floating around these days on all the blogs, Pinterest and other places. From jewlery to fabric to clothing..... this craze inspired this piece.


Now, I grew up as somewhat of a TomBoy. OK.... I was down right repulsed by "girlie" items. Hey, I could hold my own on the baseball field surrounded by rough and tough boys. I just had to remind them that I could castrate pigs. And once they saw how I could hit the ball and play a mean short stop --- they let me play.

But, now things are different. I can still castrate pigs, I just wear high heels while doing it. Hah!
No, but seriously, I am a sucker for a little bit of girlie girl pretties. After all, that's one of the blessings of being a woman.

Take this fabric for example..... swoon.

Sakura Blossom Fabric at Tonic Living
Here is my take on the same color palette. Plus, I have a larger one that I just completed with the same hues and it is simply gorgeousness!


My kiddo on the other hand.....is inspired by what to wear from the art which surrounds him.... LOL!

He did quite well with this choice of shirt!

Saved by the Bell {featured in the background} can be found at Again and Again in the Dallas Design District.

Has anything inspired you lately on Pinterest?

You can always follow my boards here:   Follow Me on Pinterest

HAVE A FABULOUS DAY!

Wednesday, May 1, 2013

Margarita Cupcakes

Oh yes, these are the REAL things baby...

MARGARITA!

CUPCAKES!

GOODNESS!


These are ADULT only cupcakes!

So, if you plan to make them for a party and you have little kiddos running around... make sure you put them in a safe place. And make sure you make a kid-friendly cupcake option {said from experience --- trust me}.


These things are delicious!

The first time I made them was for a Cinco de Mayo party last year. They were a HUGE hit. And I have been making them for special occasions several times throughout the year. So, now that Cinco de Mayo is right around the corner..... I thought I would hop to it and start the breaking process!


MARGARITA CUPCAKES

Yield: 24 cupcakes
Prep Time: 25 minutes | Bake Time: 25 minutes

Cupcakes:
1 cup all-purpose flour
2 cups cake flour
3 teaspoons baking powder*
1/2 teaspoon salt
1 cup unsalted butter, slightly softened and cut into chunks
1/2 cup Truvia
1/2 cup sugar
4 eggs at room temperature
Zest and juice of 3 limes
1/2 teaspoon vanilla extract 
1 cup of buttermilk**

* I use sodium free baking powder
** I use non-fat milk and distilled white vinegar to make the buttermilk. If you want to do this, just combine 1 tablespoon of distilled white vinegar and then add the milk to  equal 1 cup, let it sit for 5 minutes, stir and then there is your buttermilk!

Brushing for the Cupcakes:
2 to 4 tablespoons of tequila 

Tequila-Lime Frosting:
2 cups unsalted butter at room temperature
5 cups powdered sugar
2 tablespoons lime juice
4 tablespoons tequila
Pinch of coarse sea salt {if desired}

1. Preheat the oven to 325 degrees F. Line a muffin tin with paper liners; set aside.

2. In a medium bowl, whisk together flour, baking powder and salt; set aside.

3. In an electric mixer on medium-high speed, beat the butter and sugar together until pale, light and fluffy {about 4-6 minutes}.

4. Reduce mixer speed to medium and add the eggs one at a time, mixing thoroughly after each addition.

5. Add lime zest, lime juice, vanilla extract and tequila. Mix until combined. {The mixture may start to look curdled at this point, but don't worry! It will all come back together.... I am SO glad I was told about this the first time I ever did it.... cuz it really does start to look gross, but it also... really does come back together.}

6. Reduce mixer speed to low. Add dry ingredients in 3 batches, alternating with the "buttermilk" in 2 batches. Mix only until just incorporated, using a spatula to give it one last mix by hand.

7. Divide batter between the muffin cups. Bake for approximately 25 minutes or until just slightly golden and a skewer shows only moist crumbs attached, rotating the pan at the halfway point.


8. Allow the cupcakes to cool for 5 to 10 minutes then remove to a cooling rack. Brush tops of the cupcakes with the 2-4 tablespoons of tequila. Set the cupcakes aside to cool completely before frosting them.

9. FROSTING: whip butter on medium-high speed of an electric mixer using the whisk attachment for 5 minutes. Reduce the speed to medium-low and gradually add the powdered sugar, mixing and scraping the sides of the bowl, as needed, until it is all incorporated. Give it a mix on medium speed for about 30 seconds. Add lime juice, tequila and salt then mix on medium-high speed until incorporated and fluffy.

10. Frost cupcakes and garnish with lime wedge and additional sprinkling of sea salt. I also utilized the cupcake toppers found here. I just printed, circle punched and attached to large toothpicks.


AGAIN.... These are NOT kid friendly.

They really can pack a punch. So eat..... responsibly.


With the tequila in the cupcake batter, brushed on the cupcake, and in the icing.... it's delightful and refreshing.

Quite a surprise AND a sure hit at any fiesta or summertime gathering.


FIESTA! PARTY! CUPCAKES!!!


Enjoy, my friends.... ENJOY!